
Your Hip Flexor Isn’t the Problem (do this instead)
Dec 11, 2025
If you have been trying to improve hip mobility and keep running into the same tight, stiff feeling in the front of your hip, you are not alone. Most people immediately blame the hip flexor and go straight into stretching the psoas. When that does nothing, they stretch harder.
But the hip flexor is rarely the real problem.
In this breakdown, we will look at why hip flexor stiffness shows up, what is actually creating the tension, and the exercises that fix the root cause instead of the symptom.
The Hip Flexor Is Reacting, Not Causing the Issue
Whenever you feel tension through a muscle, it is almost never about the muscle itself. Muscles respond to the position of the joints they attach to. The psoas connects from the lumbar spine into the inner surface of the pelvis and femur, and it is highly sensitive to how your pelvis, rib cage, and center of mass are positioned.
Here is what typically happens.
As you repeat heavy, force-driven movements like squats or deadlifts, or spend long periods sitting, the body begins shifting the center of mass forward. At first, that is not an issue, but as the pelvis continues to dump forward and the ribs flare, your nervous system recruits muscles that can create stability and help you keep your balance. The psoas becomes one of those muscles and starts to carry more load.
The more the pelvis tips forward, the more the hip sits relatively flexed. The more the ribs flare, the more the psoas is placed on stretch. Add rotation or a hip hike and now there is even more tension.
This is why stretching the hip flexor rarely works. The muscle is responding to the position you are in. Until you change orientation, the tension will come back every time.
Position Issues That Overload the Psoas
Three main factors drive psoas tension:
1. Forward Center of Mass
When weight shifts toward the toes, the pelvis follows and tips forward. The hip sits in a flexed orientation, and the psoas becomes overloaded trying to control the position.
2. Rib Cage Flaring
Because the psoas attaches up into the diaphragm, rib flare directly affects its tension. A flared rib cage increases extension through the spine and feeds the same forward dump of the pelvis.
3. Rotation and Hip Shift
If the pelvis turns or a hip hikes, the psoas on that side tightens to pull the spine toward it. This is why you often see people shift to one side during squats or hinge patterns.
These are position problems, not flexibility problems.
Stop Stretching the Hip Flexor. Start Shifting the System.
To reduce psoas tension, you need to restore position. That means bringing the center of mass back, organizing the rib cage without crunching, and bringing the pelvis back without tucking or squeezing the glutes.
Below are the three exercises used in the video to change orientation without forcing range.
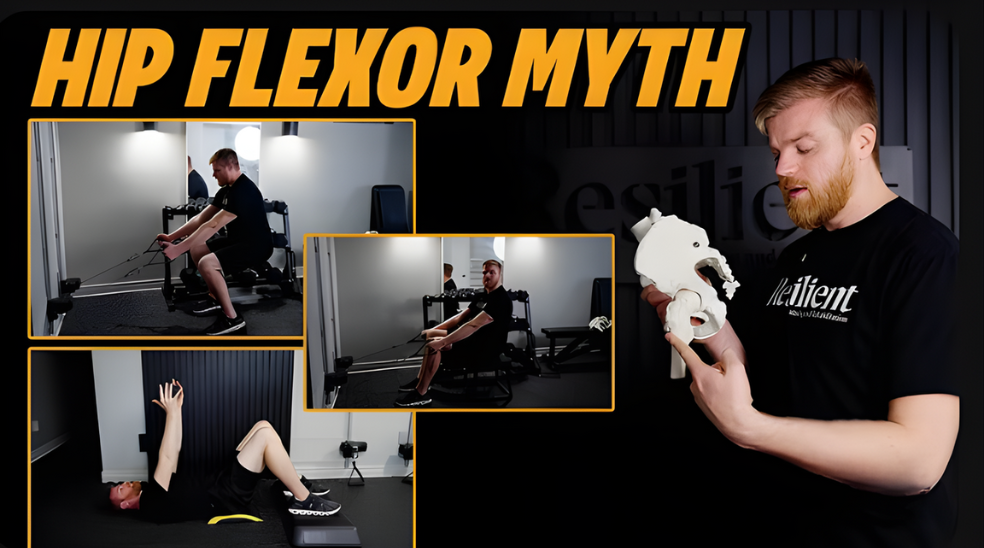
Exercise 1: Seated Cable Reach
This exercise helps shift your weight back and opens the back side of the pelvis and rib cage.
How to do it:
-
Sit with your knees slightly above your hips to naturally position the pelvis.
-
Hold cables set low and let them pull your shoulder blades apart.
-
Lean back slightly without slouching or flaring the ribs.
-
Inhale gently through the nose.
-
Exhale while maintaining the reach and letting the cables pull you forward.
What you should feel:
A broad stretch across the back, not tension in the hip flexors.
Exercise 2: Supine Reach with Elevated Feet
This drill decompresses the hips, engages the inside hamstrings, and repositions the rib cage.
How to do it:
-
Lie on your back with a pad under your hips to bring the floor closer.
-
Elevate your feet so the hips naturally shift back.
-
Press through the inside edges of your heels until you feel your inside hamstrings.
-
Keep the tag of your pants gently pressed into the ground without crunching.
-
Hold a dumbbell above your chest and reach toward the ceiling.
-
Inhale as you reach.
-
Exhale while pressing the inside heels and the tag of your pants down.
What you should feel:
Inside hamstrings and a sense of the rib cage settling without forcing a tuck.
Exercise 3: Supported Squat with Ramps
This is the dynamic progression that ties everything together and carries the new position into movement.
How to do it:
-
Stand with feet elevated on ramps.
-
Hold onto cables to help shift your weight back.
-
Let the shoulder blades spread.
-
Inhale, then descend by pushing your knees forward while your hips drop straight down.
-
Pause at the bottom.
-
Exhale to come up, keeping the knees bent at the top instead of fully straightening.
What you should feel:
Inside quads, glutes, and a sense of staying back rather than tipping toward the toes.
Watch the full video for all demonstrations and cues, then put these drills into your next session.
The Real Takeaway
Hip flexor tightness is almost never a hip flexor issue. It is a position issue. Restore the relationship between the pelvis and rib cage, shift your center of mass back, and the psoas finally stops working overtime.
If you want a full program that helps you apply these principles and rebuild better movement from the inside out, the Resilient Posture Program walks you through a structured six-week system designed to restore position and reduce chronic tension patterns.

