
Trendelenburg Gait: Why Your Hip Hikes When You Walk and How to Fix It
Jun 17, 2026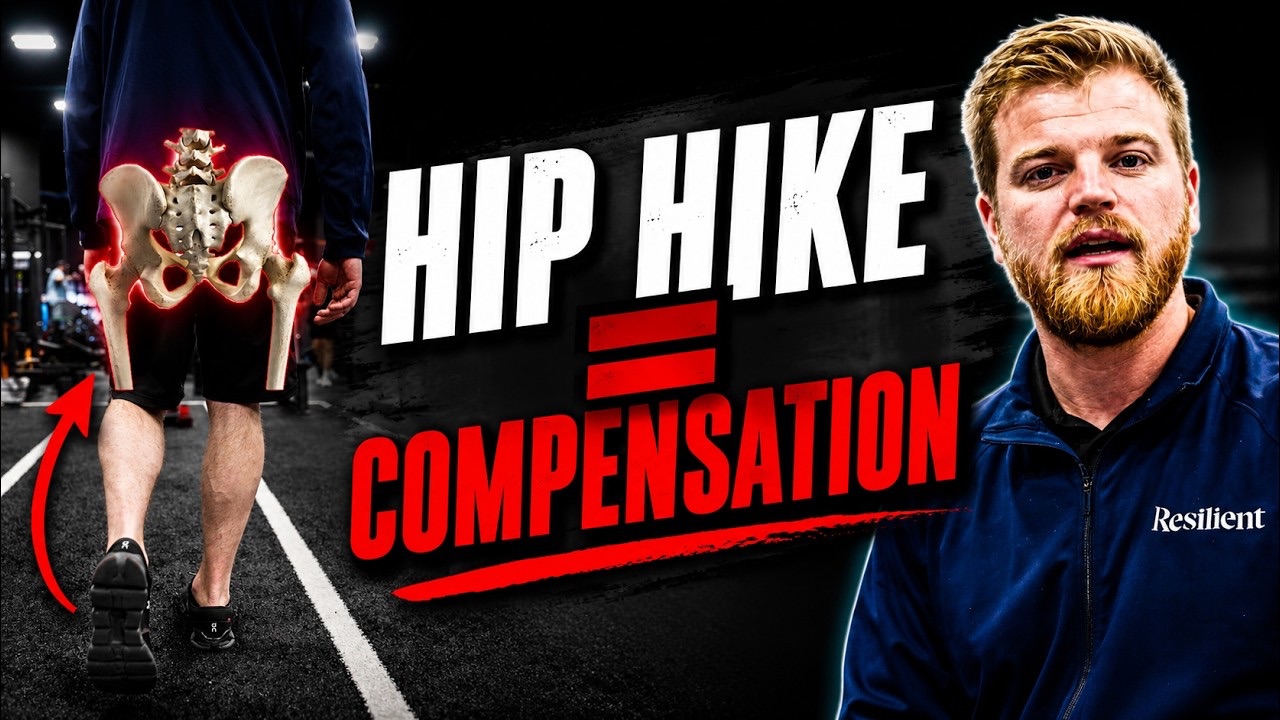
Watch enough people walk and you start to see it. One hip rises every time that leg loads. The shoulder dips.
The whole pelvis tilts for a fraction of a second before the next step catches the body. Most practitioners label it a weak glute and move on.
That label misses the actual driver, and it explains why glute work alone rarely changes the pattern.
This article breaks down what a Trendelenburg gait is, the mechanics that produce it, the reason it keeps coming back, and three exercises that rebuild a stance phase from the foot to the hip.
Want to watch the video instead? Check out the full video here:
What Is a Trendelenburg During Gait?
A Trendelenburg gait describes the hip hike you see when someone loads onto a single leg during walking.
View the person from behind. As they step and shift their weight over one foot, the opposite hip lifts toward the ceiling instead of staying level. The Trendelenburg test is essentially watching for that pelvic drop or hike during single leg loading.
The classic explanation points to the gluteus medius on the stance side. That muscle stabilizes the pelvis during single leg support, so weakness seems like the obvious cause.
The problem is, muscles aren't usually the culprit...
The Three Phases of Gait
Before the compensation makes sense, the stance phase needs a quick map. Walking gait breaks into three moments at the stance leg.
Heel strike happens when the heel contacts the ground and the body begins to accept load.
Mid stance happens when the pelvis stacks directly over the foot and the body prepares to push forward. The foot pronates and the hip internally rotates here.
Toe off happens when the heel lifts and the leg drives the body forward into the next step.
Each phase asks for specific motion at the foot, knee, and hip. When one joint cannot deliver its share, the body finds the motion somewhere else. That borrowed motion is the compensation.
Why the Hip Hikes During Mid Stance
The hip hike traces back to one missing ingredient: internal rotation of the hip during mid stance.
At mid stance the pelvis sits over the planted foot.
To move forward cleanly, the hip internally rotates and the foot pronates.
Pronation lets the arch lower, the shin travel inward, and the body pass over the foot while staying inside its base of support.
When a person cannot access that internal rotation, the body has no clean path through mid stance. It cannot stay stacked over the foot.
So your body compensates. The pelvis hikes to pull the body back toward the midline before it falls to the outside of the ankle.
As one side pushes off, the other side has to catch the body. With no internal rotation available to absorb that shift, the hip hikes to recenter the load. The motion the foot and hip should have produced gets stolen from the pelvis.
This is why glute strengthening disappoints.. If the hip cannot internally rotate at mid stance, the body still has no path through that phase, so it keeps hiking. You strengthened a muscle without restoring the motion the gait actually needs.
The Compensation Cascade
The hip hikes up. The knee caves in. The foot collapses inward.
They happen at the same instant because they are all compensations stemming from similar limitations. The body lost its ability to stay inside its base of support, so it dumps the leg inward and lifts the pelvis to stay upright. Treating any one of these in isolation leaves the other two driving the pattern.
The fix follows the cause. Restore internal rotation from the foot all the way up. Teach the body to accept load without hiking. Then teach it to produce force without hiking. Three exercises walk through that sequence.
Three Exercises to Rebuild the Stance Phase
1. Foot Supported Walkover
This drill rebuilds pelvic internal rotation and links it down to the foot, so the new position translates into gait rather than living only at the hip.
Place a foam roller under the hip at roughly belt line, on the side that hikes. For a right side hike, set up on the right hip. Plant the right foot flat against a wall and bring the right knee toward the floor. Aim to feel the outside of the thigh and the inside of the foot, not the bony outside of the knee itself. That combination cues internal rotation.
Open the back leg, breathe in, then breathe out as you bring that knee down toward the floor and roll the working hip into internal rotation. Keep the planted foot locked down through its inside edge. If the foot rolls open, the motion leaks and you lose the rotation you came for. Push back off the knee and foot to return, breathing out on each repetition. Each rep reinforces a pelvic position that hikes less when you step.
2. Banded Supported Squat With Heel Elevation
This drill teaches the leg to accept load slowly and integrates foot, knee, and hip together.
People who hike the hip tend to slam forward when they step. The body accelerates faster than the leg can control, so it collapses through the path of least resistance. Unweighting the body removes that pressure. Hold a band anchored in front of you so it pulls some weight off the working leg. Less gravity through the leg means less speed to fight, which lets you control the descent.
Elevate the heel to open the front of the ankle. This starts the knee behind the foot and lets the shin travel forward through a controlled range. Keep the elbows in front, pull lightly on the band, and drive the knee forward over the foot. Hold the hip open as you move up and down rather than tucking the pelvis under. You should feel glutes, hamstrings, and quad sharing the work while your weight stays over the heel instead of dumping onto the toes.
3. Jefferson Split Squat
This drill teaches the leg to produce force from the foot to the hip without compensating.
The load sits between the legs rather than on the back or shoulders. Two things make this useful. The bar position caps how high you can stand, which keeps tension through range. The load underneath drives you into a hinged split squat position that demands force from the foot through the hip.
Use a mixed grip to bias rotation toward one side. For a right side problem, set the right hand down and the left palm open. That grip rotates you left and teaches the right leg to push off more effectively. With the pelvis positioned, the knee and foot stacked beneath it, this is where the leg learns to extend the hip and produce force while holding everything stable from the foot up.
The Framework Behind the Three Exercises
Read across the three drills and a single progression appears.
Position the pelvis so the hip can internally rotate. Teach the body to accept force and put load through the foot, knee, and hip without collapsing. Then teach the body to produce force, extend the hip, and create an overcoming action that holds stability from the foot to the hip. Restore the motion, train the leg to receive it, then train the leg to drive through it.
Run that order on any client who hikes and you address the cause instead of chasing the symptom up at the pelvis.
Go Deeper on Gait Assessment
This article covers one of the three major gait compensations I see when assessing clients. My gait assessment course breaks down all three, shows you how to identify each one during a real assessment, and walks through the exercises that address them.
If you want the full assessment framework and the progressions that go with it, check out my Gait Assessment Course.

